Crafty? I’m not going to define it as cunning, deceitful or sly but in the obsolete as skillful, ingenious and dexterous.
If I might venture a guess, I would say I’d rather design a good project that is crafted and executed well than design a great project and have it built and crafted poorly.
Craft is important both in the quality of the instruments of design and service (drawings and models) but perhaps even more important in the actual execution of the real thing. Therefore, I thoroughly enjoy the construction phase of my work when the owner and contractor are equally concerned about craft as I am. I’d like to share one of my projects where we had one of those great moments.
This unique project needs to be shared in two episodes addressing two different fiber-cement rain-screen systems that we used for two different reasons.
This was a re-cladding of an existing (unfinished) house in Pittsburgh originally designed by another firm. The interior has yet to be completed – bare studs remain inside. My firm came in after the 5-year old cladding was prematurely failing. The Owner charged the architects he interviewed for this project with his desire to alter the appearance of the house to one that was exciting and worthy of the site. He was never content with the design of his newly built house, but that’s another story. Fortunately, he chose my firm for this project.
Below you will find annotated images explaining our process of installing a hybrid system largely consisting of the James Hardie Panel Reveal System. This system is documented in their literature and gaining popularity now. However in 2013, it was not largely represented in my region, so it took a dedicated owner, qualified and interested contractor, oh and me, a high strung, tenacious architect committed to his craft. Our 11 sheets of drawings and scores of details for the re-cladding were more than the original set of drawings to construct the entire house. The support of the local manufacturer’s representatives played an important role too to connect the literature with the real.
Why we chose this material resulted from a lengthy process of exploring cladding options that were 1) within our budget 2) were capable of being adapted to the angular and complex geometries of the existing house and 3) were easily installed by contractors less familiar with the system 4) could be installed from a swing scaffold.
Throughout the design and construction process, we had several iterations, sketches, countless meetings, site visits to other projects using similar materials, interaction with manufacturer’s representatives and a multitude of mock-ups and job meetings. For those of you looking for continuous insulation beneath the cladding, I admit it belongs there, but it was not included on this project. When we start the planning of the interior finishing, we might address it in a different way as we tackle several other technical issues.
This is our story.
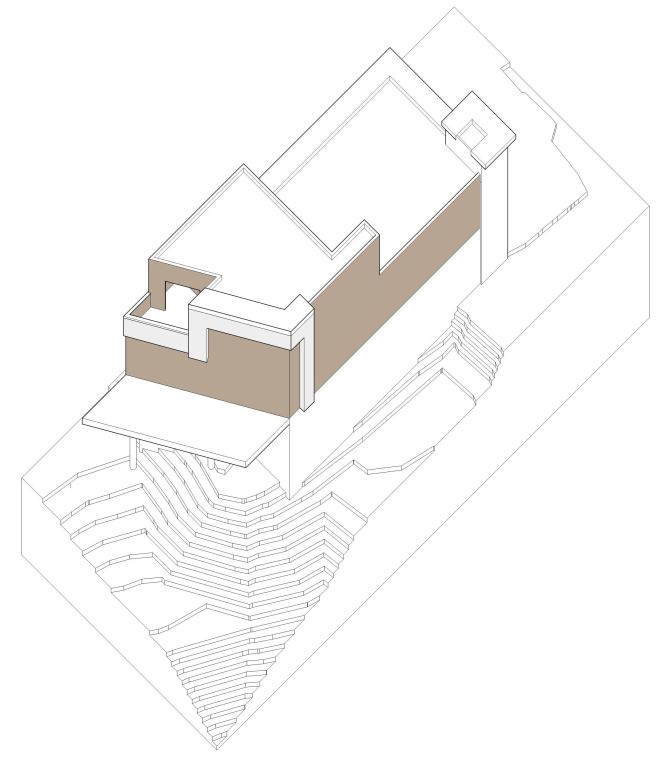
This aerial photo illustrates the existing conditions prior to our involvement. The house is in the center. The east facade is cut on an angle leaving one 60 degree corner and one 120 degree corner.
The overall gesture for this house came quickly. The details, colors, material selection and execution of the minutia took much time. This drawing makes it seem simple – a grid system of panels. How difficult can that be?
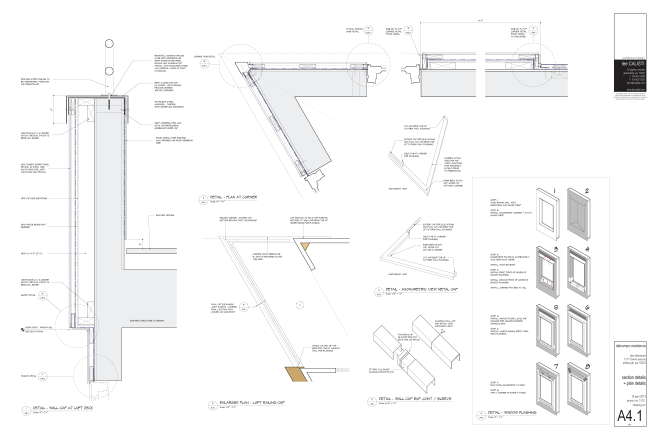
Here are only two of the sheets of details. The original lines of the house made so many atypical conditions, yet we had to work through each one, yet we still could not draw every one.
The framing started for the east side (facing the river) several weeks into the project. The difficult site required the construction take place from a swing scaffold, so the phasing made it even more complicated – a nod to our great contractor. The project was built one side at a time. This portion of the project started in late March 2013. It was staged largely from the existing deck.
The new fascia/ribbon hung carefully from the existing structure with internal cross bracing for wind resistance. A new water resistant barrier was installed and the furring and flashing began.
The system relies on the use of extruded aluminum trims for all of the corners and panels joints (not an open joint system). We worked with three different companies to find the profiles needed for all of our conditions.
Here is one condition that was challenging and fell outside of the parameters of the James Hardie system (or any system) – a 60 degree angle. None of our three trim companies made this type of corner. Most architects dream of detailing a knife-edge sometime in their career. This was one of my several attempts. Using the properties from the other trims, we had a local sheet metal fabricator create custom bent stainless steel trims per our details and specifications. They started out as aluminum, but the Owner elected to upgrade to stainless steel.
One can see a remnant of a length of trim with our details.
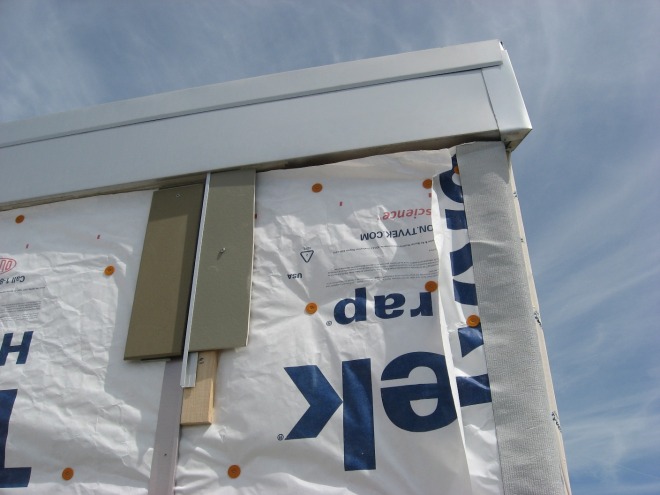
During construction, we left the protective adhered film on, but that sharp corner stands out. Here we see the drip flashing along the base of the ribbon at the soffit condition.
There were miles of flashing tape to seal all of the edges. The bottom furring strip was made out of Cor-A-Vent. It provides the air vent needed for the rain-screen system while keeping the bugs out.
The last image with the final completed corner was taken three months later in July 2013; it’s sharp.
This shows off how well the contractor cut and fit the soffit panel pieces.
As I mentioned the swing scaffolding earlier, the framing on this side occurred in May, two months later. Here one can see the ribbon framing, the studs and blocking required to receive the panel trims and fasteners. They left the old siding on until it could be removed from the scaffolding.
Here is a detail image of the furring strips, covered in adhesive tape and the PVC vent strip along the bottom. At the base is an aluminum flashing trim. The furring is necessary as part of a rain-screen system, yet we found through research that standard lumber is best. The tape was an added precaution. The furring strips have to be doubled up at panel joints due to the edge distance requirements of the manufacturer.
This is a detail with one panel installed with a vertical aluminum trim visible and a stainless steel fastener in the panel. This is a two piece trim with a joint insert that goes on after the panels are installed. Otherwise it’s virtually impossible to get the large panels slipped into the pockets of the trims. That is not something one can understand from simply drawing details. Talking with contractors provides this important crafty information.
As we turned the corner, we transitioned into another material. We discussed this for hours and this was one mock up studying the transition. The fascia above was from the original construction. Our new fascia was built out to align with the previous overhang.
A view prior to the panel installation. Notice the nice miters on the base flashing trims. Additional furring strips were placed vertically.
A view with the panels installed. We weren’t fond of the multitude of panel field fasteners, but we interpreted the manufacturer’s specifications literally so as not to void a warranty. They are not that pronounced in this image. The manufacturer’s reps also helped us determine these types of details.
Accepting the reality of the fasteners was part of the story. When one makes a ‘gesture’ on paper, we must also draw the details and fasteners at some point to understand the impact of the full system.
As the panels were being installed around the building, we were still fine tuning details as we all learned more about this system. On one chilly day in May 2013, we stood outside with the entire project team and the manufacturer’s representative to discuss and debate details. Yes more mock ups. A simple intersection of differing trims becomes complicated when you have to think about it the way the contractor thinks about it.
This wall was one of the largest challenges since it mostly consisted of windows. Working through a panel system with all of the flashing and edge details was causing everyone’s patience to wear thin.
It was getting close to the end and most of the learning had occurred and the details were turning out well. One other challenge was building it in such a way to use materials efficiently. The owner and contractor had to reorder more materials a couple of times after running out of components. They did not wish to have an abundance of left over materials, yet projects like this can be difficult to estimate.
With a system of individual panels and aluminum trims at all four sides of the panels, one learns quickly that the trims do not neatly fit over top one another and for flashing purposes, they must lap. Here is one case where a horizontal meets a vertical. The fasteners are all stainless steel. We found that the heads of these fasteners held the panels out just enough and the contractor didn’t have to have multiple fasteners in their tool belts.
Yes, we covered this detail in our drawings. Look in the upper left portion of the sheet.
At this point the contractor was begging, Lee, no more mock ups.
We did have several of these hand sketches distributed along the way. Efficiency.
We also had a series of shop drawings for a few of the custom components.
One of the first completed photographs taken, six months later after construction started. The lighting fixtures were all that was left.
This is a final photograph I took the following year once I could get there with better weather and a better sky. More can be found on my website here.
The good news of these projects comes in the building of relationships and the knowledge gained. The relationships will continue. Hopefully we will get another chance to use our knowledge and build on it for the next project.
My thanks go out to Dan my client, the contractor – 8 Point Construction and Remodeling, and Tony Zezza and Brian Rienerth at James Hardie. Teamwork gets it done.
Do you have questions about James Hardie Panel Reveal System? Are you interested in recladding your building in this system? Contact us and we’d be happy to discuss it. We’re crafty and we know a great contractor who also knows how to install it. The Owner’s thoughts appear on our Houzz page.
photos 1 & 16 – (c) Skysight Photography
all other photos by the architect
Below are some of my crafty friends. Please take time to read and interact with their posts today. #architalks
Bob Borson – Life of An Architect
@bobborson
Architects are Crafty
Matthew Stanfield – FiELD9: architecture
@FiELD9arch
On the Craft of Drafting: A Lament
Marica McKeel – Studio MM
@ArchitectMM
Why I Love My Craft: Residential Architecture
Jeff Echols – Architect Of The Internet
@Jeff_Echols
Master Your Craft – A Tale of Architecture and Beer
Mark R. LePage – Entrepreneur Architect
@EntreArchitect
How to Craft an Effective Blog Post in 90 Minutes or Less
Lora Teagarden – L² Design, LLC
@L2DesignLLC
Oh, you crafty!
Rosa Sheng – Equity by Design / The Missing 32% Project
@miss32percent
Which Craft?
Michele Grace Hottel – Michele Grace Hottel, Architect
@mghottel
krafte
Meghana Joshi – IRA Consultants, LLC
@MeghanaIRA
Crafty-in Architecture as a Craft
Brian Paletz – The Emerging Architect
@bpaletz
Underhanded Evil Schemes
Jonathan Brown – Proto-Architecture
@mondo_tiki_man
Crafty
Eric Wittman – intern[life]
@rico_w
arts and [crafty]
Cindy Black – Rick & Cindy Black Architects
merging architecture and craftiness
Tara Imani – Indigo Architect
@parthenon1
Crafting a Twitter Sabbatical


Nice! Like all the details.
Love it, Lee. As a young architect, I love seeing the details and lessons learned. Always learning something new.
Reblogged this on Architect's Trace and commented:
Lee is my hero.
Only if I can wear a cape.
Sure, black or very dark grey.
Lee;
Capes and porkpie hats are overrated at this time in architecture unless you are in the “Justice League”, with cape only unless the porkpie hat is your weapon of choice.
Bill
I actually had to look up what a porkpie hat was.
“God is in the details” applies perfectly to your panel craft. Loved staring at every picture, spent time at each detail.. more than I intended to- thank you for the much detailed blog.
Enjoy…but now I’m blushing. I was sweating and bleeding during the project though – we all were.
[…] Lee Calisti Architecture+Design, Lee Calisti immediately clarifies that he isn’t going delve into the connotation of the word […]
Lee, Well done! I love everything about this post. The determination, the art..the beautiful details. You are a real craftsman. Have you ever looked at Nichiha Fiber Cement Panels? They have a system that has built in joinery with corner pieces. It is pretty slick, however due to the modular nature only comes in a couple sizes. Keep it up!
Stephen, thank you and funny you mention Nichiha. That’s the other material I referenced. We used it for the sides of the building since they were largely blank. We came up with a pattern to make it interesting. I need better pics, but there are a few on my website – http://www.leecalisti.com/portfolio/lowrie-street-recladding. I have a young architect friend (still in school) who thinks one day he’d like to move to Charleston. I might send him your way in a few years.
Love this post Lee! Design is in the Details…as you know…and this post defines our craft perfectly! Craft in the design, in the drawings, in the details, in the execution…in the mock-ups…and a beautifully crafted post to describe it to us! (and I may “reference” your detail drawings to make sure we keep up the craft over here as well!)
Thanks Marica. At least we keep these details in our libraries to edit, rethink and use again discreetly on the next project if it presents itself. This was one of those rare, but fun projects.
Very thorough and interesting post. I especially like how the craft is explained as not only working out the details in drawings, but working through them in the field as well.